So your garage door cables snapped or frayed, and now you’re stuck. We get it. A broken cable stops everything in its tracks. The good news? Basic garage door cable replacement is something handy homeowners can tackle. We’ve walked plenty of customers through this process over the years. With the right tools and careful steps, you can get things moving again. This replacement guide made by me, the technician at DoorX garage door repair, breaks it down into six simple steps. Just remember, safety comes first. Let’s dive into how this works.
Step 1 - Gather Tools for DIY Garage Door Cable Replacement
Before touching anything, you need the right gear. This isn’t the time to improvise. Grab a socket wrench set, locking pliers, winding bars, a ladder, and work gloves. Safety glasses are a must, too. Having everything ready makes the job smoother and safer.
We always tell folks to inspect their new cables before starting. Make sure they match your door’s weight and size. The wrong cables cause problems fast. Check your owner’s manual for specifications. If you can’t find it, measure the old cables carefully. Proper preparation prevents most issues during garage door cable replacement.
Step 2 - Disconnect the Opener and Secure the Door
Before touching anything, you need the right gear. This isn’t the time to improvise. Grab a socket wrench set, locking pliers, winding bars, a ladder, and work gloves. Safety glasses are a must, too. Having everything ready makes the job smoother and safer.
We always tell folks to inspect their new cables before starting. Make sure they match your door’s weight and size. The wrong cables cause problems fast. Check your owner’s manual for specifications. If you can’t find it, measure the old cables carefully. Proper preparation prevents most issues during garage door cable replacement.
Step 3 - Release Tension to Replace Garage Door Cables Safely
Now comes the trickiest part. You need to release spring tension before removing old cables. For extension springs, the tension releases when the door is fully open. For torsion springs, use winding bars to carefully unwind them.
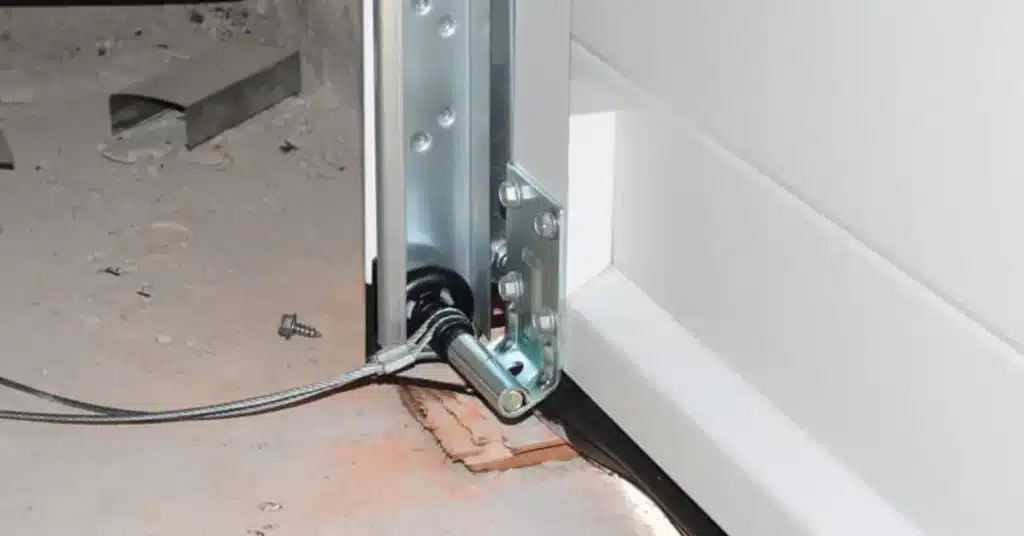
Go slow here. Never use screwdrivers or other makeshift tools on springs. Proper winding bars are essential for this step. Once tension is released, you can detach the old cables from the drum and bottom bracket. Note how everything connects before removing anything. Taking photos helps you remember the setup later. This careful approach lets you replace garage door cables safely.
Step 4 - Install New Cables for Reliable Cable Replacement
Time to put in the fresh cables. Start at the bottom bracket. Thread the cable end through and secure it with the proper fastener. Then run the cable up along the door and wrap it around the cable drum at the top.
Keep the cable tight as you wind it onto the drum. Loose cables cause serious problems. Each wrap should sit neatly next to the previous one, no overlapping. This ensures reliable cable replacement that lasts. We always double-check that the routing matches the original setup. Mistakes here lead to uneven door movement or premature cable failure.
Step 5 - Complete Your Cable Repair and Restore Tension
With new cables installed, it’s time to restore spring tension. This is the reverse of step three. Use your winding bars to carefully wind the torsion spring back up. Follow your manufacturer’s specifications for the correct number of turns.
Here’s what to check during this phase:
- Cable sits properly in the drum grooves
- No kinks or twists in the cable length
- Spring tension feels balanced on both sides
- All fasteners are tight and secure
Once tension is restored, remove the locking pliers from the track. Your cable repair is almost complete. Test the door manually first before reconnecting power.
Step 6 - Test and Verify Your Garage Door Cable Replacement
Don’t rush this final step. Lift the door manually about halfway and let go. It should stay in place, not drift up or down. If it moves, the spring tension needs adjustment. This balance check confirms your work is correct.
Reconnect the opener and test the automatic functions. Watch the cables as the door moves. They should track smoothly without jumping or rubbing. Listen for unusual sounds too. A successful garage door cable replacement means quiet, smooth operation. Run the door through several complete cycles before calling the job done.
When Expert Garage Door Cable Replacement Is the Smarter Choice
Look, we believe in empowering homeowners. Basic repairs save money and feel rewarding. But some situations call for professional help. If your springs are old or damaged, call an expert. Springs under high tension are genuinely dangerous, and we never recommend DIY spring work.
Complex systems with multiple springs or unusual setups also benefit from proper attention. Technicians complete these jobs faster because they do them daily. They spot potential cable failure before it happens. Sometimes the smartest DIY decision is knowing when to step back. Professional garage door cable replacement comes with warranties and guarantees, too. Your time and safety have value, so weigh the costs carefully.
Frequently Asked Questions
Q: How do I know if my garage door cables need replacement?
Look for visible fraying, rust, or kinks in the cables. If your door hangs crooked or won’t stay level, cables might be the culprit. Strange noises during operation also signal problems. We recommend inspecting cables every few months. Catching wear early prevents sudden cable failure that leaves you stranded.
Q: How long does garage door cable replacement typically take?
For someone with basic mechanical skills, expect two to three hours. Professionals usually finish in under an hour. The time varies based on your door type and spring system. Torsion spring setups take longer than extension springs. Don’t rush, though. Taking your time ensures the job gets done right.
Q: What causes garage door cables to break?
Normal wear is the most common cause. Cables flex thousands of times over their lifespan. Rust from moisture speeds up deterioration. Misaligned tracks put extra stress on cables, too. Poor-quality replacement parts also fail faster. Regular maintenance extends cable life significantly.
Q: Can I replace just one cable, or should I do both?
We always recommend replacing both cables together. If one failed, the other isn’t far behind. They’ve experienced the same wear over the years. Replacing both ensures balanced operation and prevents a repeat job soon. The cost difference is minimal compared to doing the work twice.
Q: Is garage door cable replacement dangerous?
It can be if you skip safety steps. The door’s weight and spring tension create real hazards. Following proper procedures keeps you safe. Never work under an unsecured door. If you’re uncomfortable with any step, especially spring work, calling a professional is the right move.
Q: How much do replacement garage door cables cost?
Cables themselves run between fifteen and thirty dollars per pair. Professional installation typically costs one hundred to two hundred dollars total. DIY saves on labor but requires tool investment. Factor in your time and comfort level when deciding. Quality cables from reputable brands last longer and perform better.